Android5.0发布后,随着Camera2的兼容性不断提升,目前完全可以替代旧API的使用。而Camera2在调用方法、相机设置、图片获取等方面都变化很大。
在实时预览图像获取时,通用的图片格式由 YUV_NV21 变为 YUV_420_888 ,因此在转换为Bitmap时出现了问题,由于Google并没有直接提供YUV2RGB的方法,因此网上代码鱼龙混杂,本文总结了几个高效的转换方法。
//Camera API
public void onPreviewFrame(byte[] data, Camera camera){
    YuvImage image = new YuvImage(data, ImageFormat.NV21, size.width, size.height, null);
}
//Camera2 API
public void onImageAvailable(ImageReader reader){
    Image image = reader.acquireLatestImage();
}
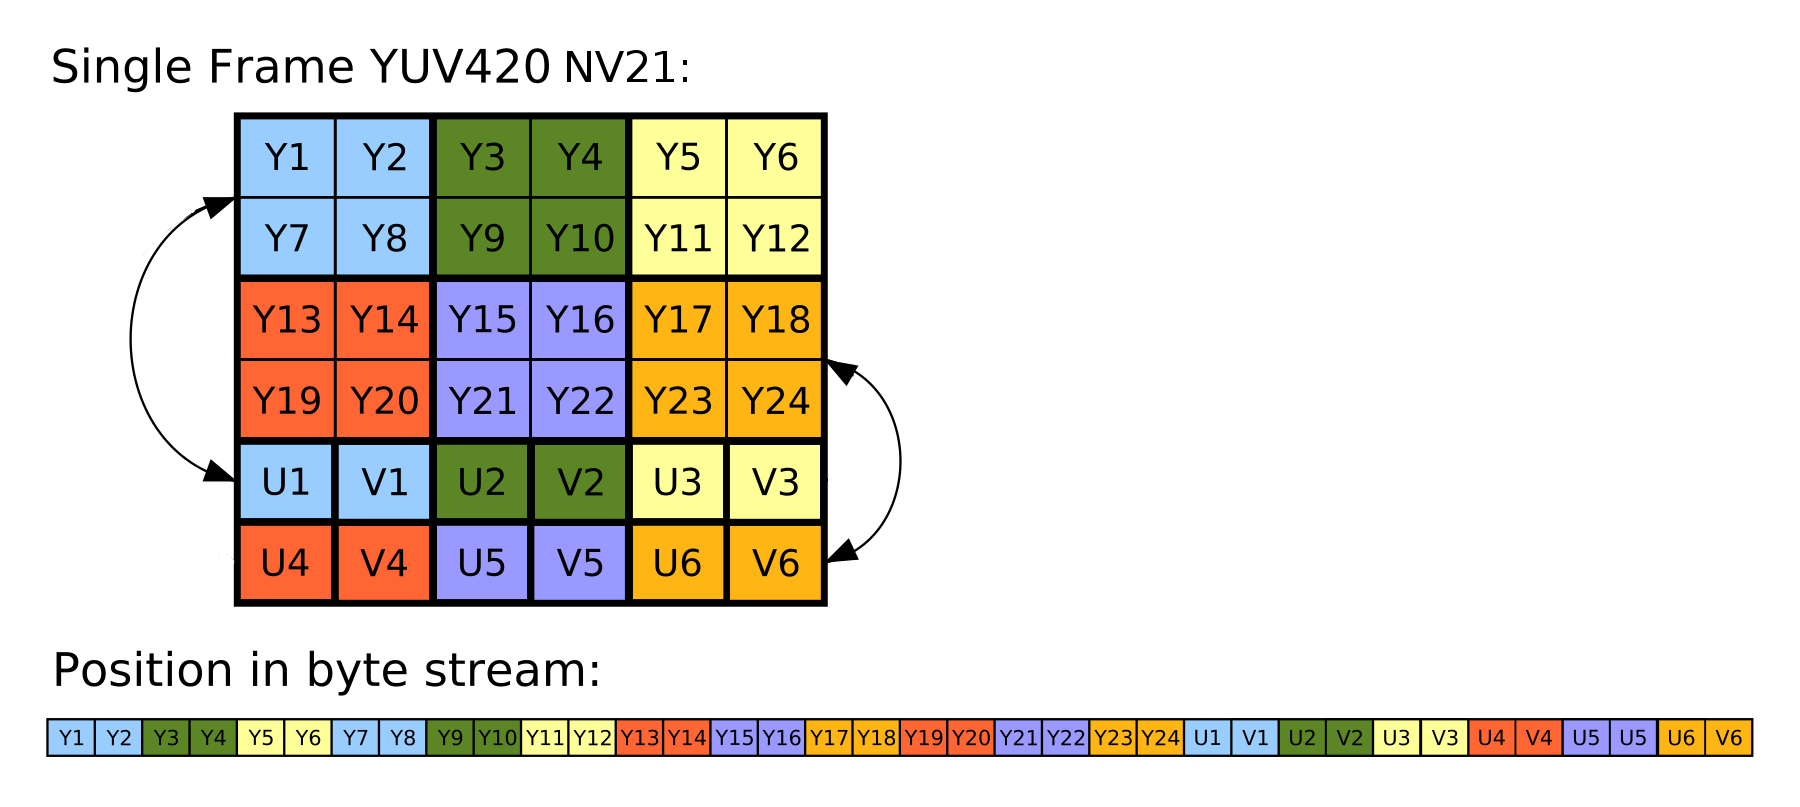
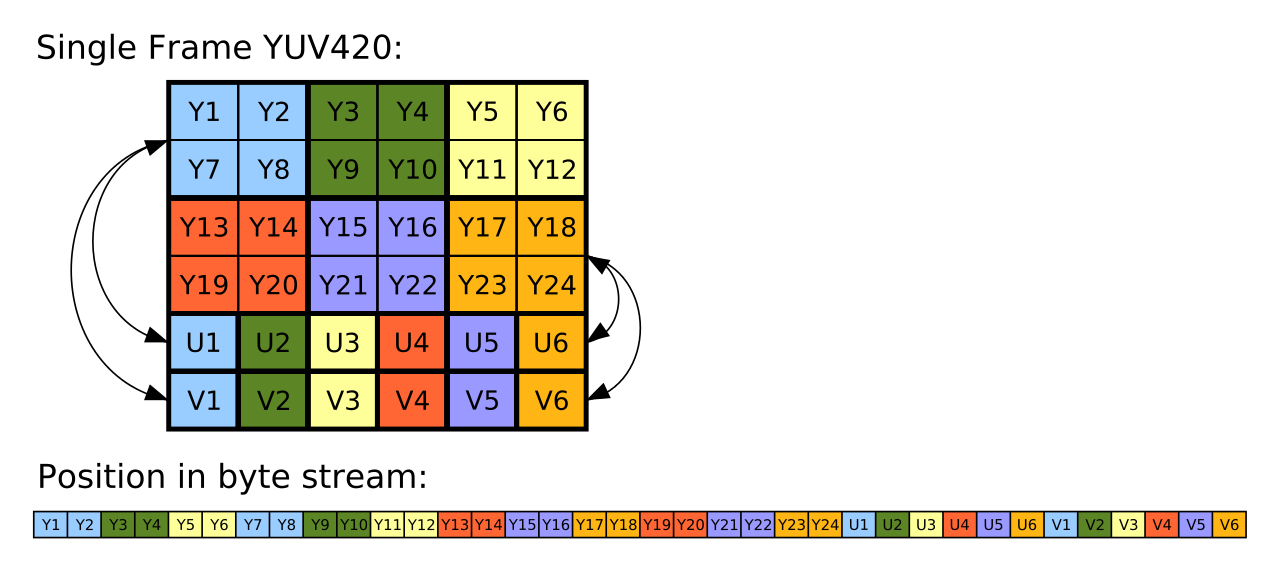
原理


可以看出NV21和YUV很相似,因此由NV21[/latex]gt;RGB的时间与YUV[/latex]gt;RGB的时间相似。
JAVA直接转码
该方法实现简单,处理640×480预览图平均时间为33ms
public void onImageAvailable(ImageReader reader) {
    Image image = reader.acquireLatestImage();
    if (image == null) return;
    ByteArrayOutputStream outputbytes = new ByteArrayOutputStream();
    ByteBuffer bufferY = image.getPlanes()[0].getBuffer();
    byte[] data0 = new byte[bufferY.remaining()];
    bufferY.get(data0);
    ByteBuffer bufferU = image.getPlanes()[1].getBuffer();
    byte[] data1 = new byte[bufferU.remaining()];
    bufferU.get(data1);
    ByteBuffer bufferV = image.getPlanes()[2].getBuffer();
    byte[] data2 = new byte[bufferV.remaining()];
    bufferV.get(data2);
    try {
        outputbytes.write(data0);
        outputbytes.write(data2);
        outputbytes.write(data1);
    } catch (IOException e) {
        e.printStackTrace();
    }
    final YuvImage yuvImage = new YuvImage(outputbytes.toByteArray(), ImageFormat.NV21, image.getWidth(),image.getHeight(), null);
    ByteArrayOutputStream outBitmap = new ByteArrayOutputStream();
    yuvImage.compressToJpeg(new Rect(0, 0, image.getWidth(), image.getHeight()), 95, outBitmap);
    Bitmap bitmap = BitmapFactory.decodeByteArray(outBitmap.toByteArray(), 0, outBitmap.size());
    image.close();
}
NDK方法
从理论上来说用c运算的效率会比java高,处理640×480预览图平均时间为24ms
代码详见我的Github
public void onImageAvailable(ImageReader reader) {
Image image = reader.acquireLatestImage();
Image.Plane[] plane = image.getPlanes();
byte[][] mYUVBytes = new byte[plane.length][];
for (int i = 0; i < plane.length; ++i) {
    mYUVBytes[i] = new byte[plane[i].getBuffer().capacity()];
}
int[] mRGBBytes = new int[640 * 480];
for (int i = 0; i < plane.length; ++i) {
    plane[i].getBuffer().get(mYUVBytes[i]);
}
final int yRowStride = plane[0].getRowStride();
final int uvRowStride = plane[1].getRowStride();
final int uvPixelStride = plane[1].getPixelStride();
ImageConvert.convertYUV420ToARGB8888(
        mYUVBytes[0],
        mYUVBytes[1],
        mYUVBytes[2],
        mRGBBytes,
        image.getWidth(),
        image.getHeight(),
        yRowStride,
        uvRowStride,
        uvPixelStride,
        false);
Bitmap mRGBframeBitmap = Bitmap.createBitmap(image.getWidth(), image.getHeight(), Bitmap.Config.ARGB_8888);
mRGBframeBitmap.setPixels(mRGBBytes, 0, image.getWidth(), 0, 0, image.getWidth(), image.getHeight());
image.close();
}
RenderScript方法
RenderScript、OpenGL、ndk是安卓下三大加速法宝,RenderScript运算的效率应介于java和ndk之间,处理640×480预览图平均时间为26ms
1.修改app的build文件
    defaultConfig {
        applicationId "..."
        minSdkVersion 21
        targetSdkVersion 26
        versionCode 1
        versionName "1.0"
        testInstrumentationRunner "android.support.test.runner.AndroidJUnitRunner"
        **renderscriptTargetApi 19**
        **renderscriptSupportModeEnabled true**
    }
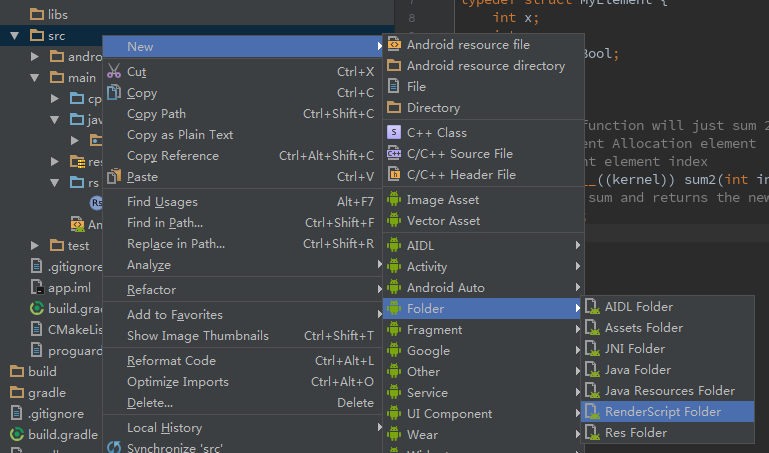
2.创建RenderScript文件夹
工程列表[/latex]gt;app[/latex]gt;右键[/latex]gt;New[/latex]gt;Folder[/latex]gt;RenderScript Folder
3.建立rs文件 yuv420888.rs
      #pragma version(1)
      #pragma rs java_package_name(me.immi.mycare);
      #pragma rs_fp_relaxed
      int32_t width;
      int32_t height;
      uint picWidth, uvPixelStride, uvRowStride ;
      rs_allocation ypsIn,uIn,vIn;
     // The LaunchOptions ensure that the Kernel does not enter the padding  zone of Y, so yRowStride can be ignored WITHIN the Kernel.
     uchar4 __attribute__((kernel)) doConvert(uint32_t x, uint32_t y) {
     // index for accessing the uIn's and vIn's
    uint uvIndex=  uvPixelStride * (x/2) + uvRowStride*(y/2);
    // get the y,u,v values
    uchar yps= rsGetElementAt_uchar(ypsIn, x, y);
    uchar u= rsGetElementAt_uchar(uIn, uvIndex);
    uchar v= rsGetElementAt_uchar(vIn, uvIndex);
    // calc argb
    int4 argb;
        argb.r = yps + v * 1436 / 1024 - 179;
        argb.g =  yps -u * 46549 / 131072 + 44 -v * 93604 / 131072 + 91;
        argb.b = yps +u * 1814 / 1024 - 227;
        argb.a = 255;
    uchar4 out = convert_uchar4(clamp(argb, 0, 255));
    return out;
    }
4.rebuild项目
5.YUV_420_888_toRGB8888方法
    public static Bitmap YUV_420_888_toRGB8888(Context context, Image.Plane[] planes, byte[][] yuvBytes, int width, int height){
        int yRowStride= planes[0].getRowStride();
        int uvRowStride= planes[1].getRowStride();  // we know from   documentation that RowStride is the same for u and v.
        int uvPixelStride= planes[1].getPixelStride();  // we know from   documentation that PixelStride is the same for u and v.
        RenderScript rs = RenderScript.create(context);
        ScriptC_yuv420888 mYuv420=new ScriptC_yuv420888(rs);
        Type.Builder typeUcharY = new Type.Builder(rs, Element.U8(rs));
        typeUcharY.setX(yRowStride).setY(height);
        Allocation yAlloc = Allocation.createTyped(rs, typeUcharY.create());
        yAlloc.copyFrom(yuvBytes[0]);
        mYuv420.set_ypsIn(yAlloc);
        Type.Builder typeUcharUV = new Type.Builder(rs, Element.U8(rs));
        typeUcharUV.setX(yuvBytes[1].length);
        Allocation uAlloc = Allocation.createTyped(rs, typeUcharUV.create());
        uAlloc.copyFrom(yuvBytes[1]);
        mYuv420.set_uIn(uAlloc);
        Allocation vAlloc = Allocation.createTyped(rs, typeUcharUV.create());
        vAlloc.copyFrom(yuvBytes[2]);
        mYuv420.set_vIn(vAlloc);
        // handover parameters
        mYuv420.set_picWidth(width);
        mYuv420.set_uvRowStride (uvRowStride);
        mYuv420.set_uvPixelStride (uvPixelStride);
        Bitmap outBitmap = Bitmap.createBitmap(width, height, Bitmap.Config.ARGB_8888);
        Allocation outAlloc = Allocation.createFromBitmap(rs, outBitmap, Allocation.MipmapControl.MIPMAP_NONE, Allocation.USAGE_SCRIPT);
        Script.LaunchOptions lo = new Script.LaunchOptions();
        lo.setX(0, width);  // by this we ignore the y’s padding zone, i.e. the right side of x between width and yRowStride
        lo.setY(0, height);
        mYuv420.forEach_doConvert(outAlloc,lo);
        outAlloc.copyTo(outBitmap);
        return outBitmap;
    }
6.使用示例
    public void onImageAvailable(ImageReader reader) {
        Image image = reader.acquireLatestImage();
        Image.Plane[] planes = image.getPlanes();
        for (int i = 0; i < planes.length; ++i) {
            final ByteBuffer buffer = planes[i].getBuffer();
            if (yuvBytes[i] == null) {
                yuvBytes[i] = new byte[buffer.capacity()];
            }
            buffer.get(yuvBytes[i]);
        }
        Bitmap processBitmap = UtilImage.YUV_420_888_toRGB8888(MainActivity.this,planes,yuvBytes,640,480);
        image.close();
    }
其他方法
还有一些其他的转换方法,效率与上面类似,不再细说

厉害了
RenderScript 方法中yAlloc.copyFrom(yuvBytes[0]);这句报错android.support.v8.renderscript.RSIllegalArgumentException: Array too small for allocation type
so库方法:public static native void convertYUV420ToARGB8888 这个方法报红,而且生成的版本不全
RenderScript 错误请检查你传入的参数是否正确
so库方法需要as项目支持nkd(目前as默认cmake了需要手动修改),ndk方法默认都是红的
感谢及时回复!onImageAvailable回调中yuvBytes[]这个怎么来的?是这样byte[][] yuvBytes = new byte[planes.length][];定义的吗?
yuvBytes[]这个还是太明白哪儿来的
在RenderScript方法的onImageAvailable函数中,yuvBytes只是一个全局变量,定义方式为byte[][] yuvBytes = new byte[3][];
目前用android.renderscript,不是android.support.v8.renderscript,转出来是图片结果,图片上半部正常显示,下半部分绿色一片,这是为什么?
在文章“6.使用示例”中有yuvBytes[]的代码,代码已经多次部署,100%靠谱的
NDK方案和renderscript方案是否能添加 旋转 的功能接口,我是转换出来生成bitmap,发现前置摄像头的图片位置偏差90°